elearning solutions
Please note: due to the proprietary nature of these work samples, some materials cannot be shared here in full.
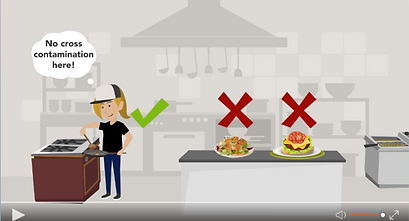
Example 1: Food Safety Course for Restaurant Employees
-
Audience: All restaurant and corporate annual compliance course)
-
Skills Used: script writing, storyboarding, iterative review process, project management and PM tool, voiceover recording and editing, music editing, photo editing, survey creation, internal and external collaboration and communication
-
Tools Used: Articulate Storyline, Articulate Review, Vyond, Adobe Photoshop, Adobe Audition, Adobe Illustrator, Microsoft PowerPoint, Microsoft Word, Envato Elements, Lytho Project Management
-
Highlights: custom restaurant "map" for real-world application, navigation and retention; interactive activities such as custom drag and drops, sliders, sorting, and roleplay; inclusive elements applicable to all three brands; separate course for Spanish learners; integrated accessibility features

Context
Prior to the creation of this course, the company had an extensive food safety course series that was split into five separate courses and took over an hour to complete.
The Director of Food Safety (our SME) at the company reached out to the e-Learning team to discuss the idea of having a shortened food safety course which would be included in annual compliance for all employees. The goals of this shortened course were to cut the content from the existing course down from 75 minutes to 25 minutes; have all sections in one course file rather than five separate ones; and update the look and feel to be more modern and relatable to the company’s culture.
The Process
I worked very closely with a fellow e-Learning designer and we took this project on together from start to finish. While we split responsibilities within this project, we were in constant communication and leaned into each other for support when needed.
Our SME provided us with draft content from the existing courses to be included in this condensed course. It was up to us to organize this content in a meaningful way and make it engaging for our end users. I took the lead on organizing course content and ensuring that objectives were met through our Storyline slides, Vyond videos, and interactions. My partner took the lead on the graphic design aspect of creating elements. Together, we brainstormed videos and interactions that we would include.
We began by creating a storyboard in Microsoft PowerPoint which included the slide content, slide narration, slide effects/interactions, and some screenshots of what we were envisioning. The storyboard was then reviewed, revised, and approved by our managers and our SME.
Once our storyboard was approved, we began creating our animations in Vyond, locating music and other graphics from Envato Elements, adding content and interactions to Storyline, and recording and editing audio.
Throughout this project, we also started testing the course in the LMS so we could ensure that interactions on desktop, mobile, and tablet would work as intended before we got the end of development. This saved us significant time at the end, as we were able to catch issues and fix them earlier in the process.
The Final Product
After multiple rounds of review, we had an approved course! The script was sent off for Spanish translation, and we quickly completed the Spanish version as well. We successfully met our time goal, consolidated the five courses into one, and adjusted the voice of the course to better suit the company’s culture. This course is still used in annual compliance.
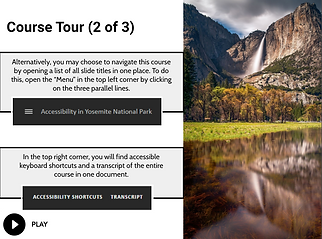
Example 2: Accessibility in Yosemite National Park Course
-
Audience: classmates at Alabama; designed for those looking for accessible options in Yosemite N.P.
-
Skills Used: researching, storyboarding, knowledge of WCAG 2.2 and Section 508, user testing, responsive design, photo editing
-
Tools Used: Articulate Storyline, Adobe Photoshop, Envato Elements
-
Highlights: light and dark mode for user preference; optional course tour to describe player and navigation options; optional audio playback; multiple methods of navigation; accessibility shortcuts slide and integrated accessibility functions; inclusivity through universal design for learning

Context
I created this course for an assignment through my Master’s program at Alabama. We were tasked to create an accessible e-Learning course on any topic, utilizing standards from WCAG 2.2.
The Process
I love traveling and the outdoors and am very passionate about accessibility. In my time working in higher ed Instructional Design, I spent countless hours working on creating digital materials that were as accessible as possible to users with disabilities. When creating this project, I decided to marry these two passions together, so I researched accessibility within Yosemite National Park.
When writing and organizing content, I asked myself, “What kind of information would a traveler needing accessible accommodations want to know when visiting Yosemite?” I used the National Park Service website and personal blogs to conduct my research and organized my thoughts in a Word document.
I was already familiar with WCAG 2.2 and general accessible practices; however, I was not yet overly familiar with the accessibility features within Storyline. I did a significant amount of research on how to meet each WCAG 2.2 standard within Storyline, and got to work creating!
The Final Product
I am very proud of this course, as it allowed me to learn more about accessibility within Storyline to apply to future projects that will benefit users. I was able to test out ideas and be creative. While it’s not possible to make a completely accessible course for every single user, I still grew my skills in making a course more accessible. I also gained experience with using assistive technology tools: I tested this course using text-to-speech apps and the screen reader NVDA, and tested using VoiceOver on iPhone.
Lastly, this course served as a blank canvas for me to integrate Universal Design for Learning wherever I could to make a better product for the end user.

Example 3: Leveraging AI in Instructional Design Video
-
Audience: Instructional Designers
-
Skills Used: script writing, storyboarding, iterative review process, voiceover recording and editing, music editing, screen recording and editing, visual design
-
Tools Used: Vyond, Adobe Audition, Descript, Microsoft PowerPoint, Microsoft Word, ChatGPT
-
Highlights: real-world application of how ChatGPT can be used by IDs; examples of ChatGPT inputs and outputs; screen recordings showing the process of using ChatGPT; music and narration

Context
When ChatGPT came out in 2022 and talks of AI became even more frequent, I didn't jump into it immediately. But as time went on, and more and more people began using it, I decided I wanted to learn more about how it could be used as a supplemental tool. I tasked myself with researching and practicing with ChatGPT to see if or how it could enhance my team's work.
The Process
To try and learn the tool better, I wanted to "live" the experience of using ChatGPT to assist with content creation. I thought this would help me determine if it would work for me as a tool in my toolkit. So I dove right in, and I used ChatGPT to write an outline and script for this video. It was a good starting point! I spent some time tweaking and refining, adding some details and removing others; but, it helped get me started.
Next, I moved on to creating a storyboard in Microsoft PowerPoint. I like visual storyboards, and this template works well for me. Once my storyboard was complete, I jumped into Vyond and got to work creating. I made some visual concept changes from my original storyboard as I went along. Also, I added some to my script once I saw exactly how my concept was translating into Vyond. The heart of the content remained the same.
Lastly, I recorded and edited audio and music, added it into Vyond, and sent the video out to a few colleagues for review. A couple of revisions later, my video was complete!
The Final Product
This video is just over three minutes long and starts by defining Instructional Design and explaining ChatGPT. Then it goes into three ways that Instructional Designers can use ChatGPT to enhance their process: brainstorming, content generation, and providing feedback/suggesting revisions. This video was added to a presentation I gave to the team about how we could use ChatGPT in our work.
Ultimately, completing this project taught me some ways that ChatGPT can be leveraged to enhance our work as IDs. However, I think it should only be used strategically and with a clear purpose. I was certain to add to the video that it isn't a perfect technology, and it shouldn't be relied on. However, it can be used as a good starting point and as a supplemental tool.
Click the video above to play.
Example 4: Making the Perfect PB&J eLearning Course
-
Audience: Anyone - just for fun!
-
Skills Used: task analysis, content organization, content writing, photography, photo editing
-
Tools Used: Articulate Rise, Articulate Storyline, Articulate Review, Adobe Photoshop, Microsoft Word
-
Highlights: measurable learning objectives, scaffolding, engaging images, instructional image with hot spots, interactive process cards, interactive drag-and-drop practice activity, labeled diagram

Context
I created this course just to have some fun in Rise. I LOVE peanut butter and jelly sandwiches and thought it was the perfect topic!
The Process
First, I created learning objectives and then completed a task analysis. Making a PB&J (especially a triple-decker PB&J!), is a lot more complex than just putting peanut butter and jelly on bread and taking a bite. Once my task analysis was completed, I began brainstorming how best to organize the information and some strategies to make mundane topic as engaging and visually appealing as possible.


The Final Product
This Rise course includes a light-hearted scenario to provide some context, and then breaks down into four parts:
-
What You'll Need: a description of materials needed to make the PB&J, using an image with hot spots
-
Prep Work: includes a labeled image to show the anatomy of a PB&J and interactive practice activity created in Articulate Storyline
-
Sandwich-Making: a process interaction showing each individual step in making a PB&J
-
Course Wrap-Up: revisits learning objective and provides a brief course summary

Example 5: De-Escalation Videos for Restaurant Employees
-
Audience: Front of House employees in a restaurant
-
Skills Used: script writing, storyboarding, iterative review process, project management and PM tool, voiceover recording and editing, music editing, photo editing, survey creation, internal and external collaboration
-
Tools Used: Articulate Storyline, Articulate Review, Vyond, Adobe Photoshop, Adobe Audition, Adobe Illustrator, Microsoft PowerPoint, Microsoft Word, Envato Elements
-
Highlights: de-escalation acronym for easier retention; custom real-world restaurant backgrounds specific to each brand; custom characters to fit each brand; position-specific scenarios; music and narration; separate Spanish versions; closed captions
![[company logo].png](https://static.wixstatic.com/media/f3beb2_ae8a142cd39e44939da7d028cc2105e1~mv2.png/v1/fill/w_520,h_287,al_c,q_85,usm_0.66_1.00_0.01,enc_avif,quality_auto/%5Bcompany%20logo%5D.png)
Context
Due to an increased occurrence of incidents with upset guests in the restaurants, Service Coaches from the field requested a video series with strategies to de-escalate upset guests for each front-of-house position: host, Server, Bartender, and Busser. In order to customize each video for each restaurant concept, separate videos would need to be created for restaurant concept as well as separate videos for English and Spanish.
The Process
For this project, I collaborated heavily with a teammate (a Field Content Specialist) as my SME. We worked closely on scripting and making revisions based on stakeholder feedback. To make the videos as real-world as possible, we used scenarios that our managers reported as frequent occurrences in the stores.
Once the script was approved, I primarily used Vyond to create the videos, with some work in Adobe Photoshop and Audition. To make the videos as real-world as possible, I used real images from a restaurant as the background, which required some editing and cutting elements out in Photoshop. I also recorded and edited the narration and used music clips from Envato Elements, which I put into Audition to modify the clip length.
As is typical with a creative project, there were many rounds of review and revision as more stakeholders became involved. I worked closely with my SME using Microsoft Teams chat and video calls to knock out edits in a timely manner.
The last step was to send the videos to one of our markets for review and to answer survey questions I created about their experience. The Managing Partners in that market completed the survey. Undeniably, feedback was positive, and no further edits were required!
The Final Product
At the end of this project, I had a collection of sixteen total videos: one for each position (Host, Server, Bartender, Busser) for both restaurant concepts, and an English and Spanish version for each video. Each positional video used a different real-world scenario to apply to what they may actually be experiencing. Each video used the same steps for de-escalation so that managers could discuss the same concept but apply to everyone in the front-of-house.
These videos are auto-assigned to new hires starting in these positions.